Rock Your Camera – Blissdom 2013
 You have a DSLR, now what? Here are some tips from moving your camera settings from automatic into manual mode. This session was led by Anna Epp.
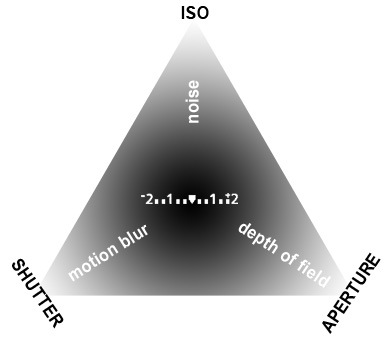
- Basic Exposure Triangle

- ISO. ISO measures the sensitivity of the image sensor. The lower the number the less sensitive your camera is to light and the finer the grain. Higher ISO settings are generally used in darker situations to get faster shutter speeds (for example an indoor sports event when you want to freeze the action in lower light) – however the cost is noisier shots.
- Aperture. Aperture is “the size of the opening in the lens when a picture is taken.” In most landscape photography, you’ll have a small aperture settings (large numbers). This ensures that from the foreground to the horizon is relatively in focus. On the other hand in portrait photography, it can be very handy to have your subject perfectly in focus but to have a nice blurry background in order to ensure that your subject is the main focal point and that other elements in the shot are not distracting. In this case you’d choose a large aperture (small number) to ensure a shallow depth of field. F-stop needs to be in the middle or to the right.
- Shutter Speed. Shutter speed is “the amount of time that the shutter is open.” In most cases you’ll probably be using shutter speeds of 1/60th of a second or faster. This is because anything slower than this is very difficult to use without getting camera shake. Camera shake is when your camera is moving while the shutter is open and results in blur in your photos.
- Priority Modes.Aperture and Shutter Priority modes are really semi-manual modes. Aperture Priority Mode often uses a symbol of “A” or “Av” to indicate it’s selected. Shutter Priority Mode often uses a symbol of “TV” or “S” to indicate it’s selected, and it best used during soccer games, waterfalls and other action shots.
- Composition. The rule of thirds states than an image is most pleasing when its subjects or regions are composed along imaginary lines which divide the image into thirds — both vertically and horizontally.
- Finding the Light.When it comes to getting accurate colors, nothing is better than nailing your white balance settings right on the head. If the white balance is even slightly off,it can produce a highly noticeable bluish or reddish tinge. It can enhance the appeal of clouds or night time photography.


8 Comments
martha
thanks for the tips! i always use manual, such a handy list of tips! 🙂
Debra @ A Frugal Friend
A reminder that I need a better camera !!! 🙂
Jennifer B
I have to say that mine was the best birthday gift that I have ever received. I waiting many years to finally get. 🙂
Carrie
I have so got to figure out my camera…this is great! I don’t know how to shoot in manual, and I know I need to work on the white balance because my pictures often have a bluish tint…it’s just so overwhelming!
Jennifer B
Some of the best advice I got was take a class at a community college. I really need to do this because an hour session is not going to cut it. 😉
Jana
I need to pay attention to all of this for reals!! Pinned so I can be sure to look back on this again…
Marla Zickefoose
Thanks for the tips! I have been trying to perfect my photo taking skills!
Gena
These tips are great…thank you!